April 12, 2016

Mixing It Up with Sketches and CASEing!


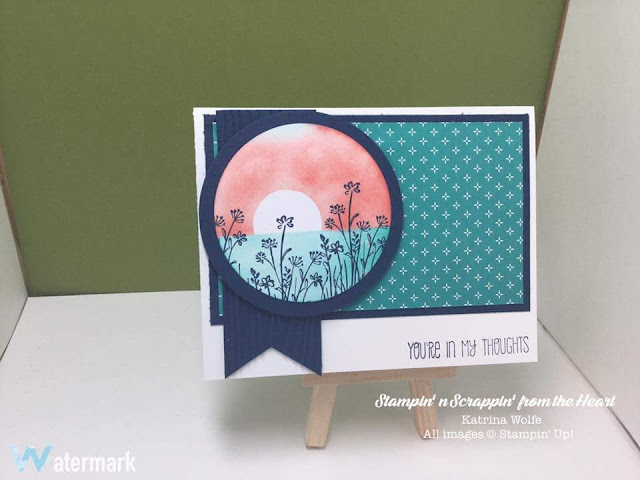
Happy Tuesday! I hope you all are getting in some crafty time? I spent my Sunday in my craft room getting ready for Thursdays class and just playing around. I know I have mentioned before that we have a weekly sketch challenge over on my Facebook page, and I fell in love with a card design that fellow demonstrator Tami White had done, so I CASE’d her card changing up the layout and stamp set. You can see her original card here. And this is what I came up with.

I love these colors together. And I love this sketch.
You should visit my FB page and see all of the wonderful designs the ladies have come up with. So much creativity! It’s amazing! And so much fun! (Anyone is welcome to join us! So feel free)

I hope you all have a wonderful week and I will see you again here soon!

Happy Stampin’

Katrina
April 9, 2016

Getting Birthday Ready for April

Happy Saturday! I'm getting ready to send out my April birthday cards. As you can see, April is a busy birthday month for me as I have lots of family and friends with April birthdays. I think April and December are my biggest months for birtday cards. I will definitely need to replenish may birthday card supply after this that's for sure. Of course I knew this so I did plan my April class themes around birthdays. I mean really, who doesn't need birthday cards? 


So, that's how I'm spending my Saturday. How are you spending yours? What month is your busiest Birthday Month? Let me know in the comments below.
Happy Stamping,
Katrina

April 7, 2016

Faux Tearing

Hi there! Tonight, I played with a technique I saw recently on line using the faux tearing technique and this is what I came up with:

Card #1 uses Calypso Coral and Whisper White cardstock along with Calypso Coral, Pear Pizzaz and So Saffron inks sponged between 2 pieces of torn copy paper masks. The stamped image is from the Into the Meadow stamp set found in the Occassions Spring catalog using the Basic Black Archival ink.
Card #2 uses Chocolate Chip, Crumb Cake and Very Vanilla cardstocks with Crumb Cake ink sponged on using a torn piece of copy paper as a mask and stamping the sentiment and flowers from the Birthday Blossoms stamp set. I also stamped and sponged 3 additional flowers and punched them out using the coordinating Pansy Punch and added them to the card using Stampin' Dimensionals. I added the Crumb Cake satin stitched ribbon.
So, what do you think? Leave a comment below and let me know what your thoughts are on this technique. Give it a try, pull out some inks, sponges and copy paper and see what you come up with.
Happy Stamping,
Katrina

April 5, 2016

Sad News about Weekly Deals


Yes, sadly, the weekly deals will be leaving us forever come April 18th. So, my advice, don't miss out! I have never seen this many current items on sale as this week! Click here to see these amazing deals!
I'm sure you're wondering where I was Saturday since I missed my post and I'm much later than normal today getting my post up. Well, I spent the weekend Spring cleaning with my husband. He had the last 2 weeks off and for the last several days, he got a dumpster for us to do some serious cleaning out. He went to town in the basement while I went to town in my craft room. I think my craft room lost 100 lbs! But I am so glad I had this opportunity to clean things out and organize my supplies. It's once again my happy place!

I have also been prepping for my class tomorrow evening. We're going to be working on the Shaving Cream technique. So FUN! If you haven't tried this technique, you need to try it out. You get some of the most beautiful marbled backgrounds using this technique and everyone is always different, no two are ever the same.


We're making 3 each of 3 designs for a total of 9 cards each. I'm so excited to show these ladies how to do this fun technique. There's something about getting all inky that just screams fun!

Well be sure to check out this weeks deals and I will check back in Thursday. In the meantime,
Happy Stamping,
Katrina

March 31, 2016

All Good Things Must Come to an End


Hi there! I do hope you are getting an opportunity to enjoy this beautiful Spring like weather we are having? Winter is going to make a come back this weekend…yuk! But, it will be short lived and Spring will be back to stay hopefully.

Anyway, I wanted to remind you that today is the FINAL day of Sale-a-Bration 2016! It won’t be back for another year, so, if you want to earn that cool stamp set you saw and haven’t done so yet, now is your last chance. Remember, for Sale-a-Bration, for every $50 you spend before shipping and tax, you get to choose an awesome FREE Sale-a-Bration item. I love Sale-a-Bration, I love the FREE items you can earn and it’s a great time to join Stampin’ Up!® too! During Sale-a-Bration, if you sign up to be a demonstrator, in addition to all the normal perks, you get to choose an additional $30 in product FREE for your starter kit! This is by far the BEST deal imaginable. You choose a total of $155 in product and pay only $99; and on top of all that, you get free shipping! If you find that to be intriguing, visit the Business Opportunity page to learn more. I would absolutely love to have you join my team.

Another great Sale-a-Bration sale going away after today, is the Paper Pumpkin pre-paid subscription sale! Yes, insert sad face here. Right now, you can get a 3 month subscription to Paper Pumpkin for only $55 AND you can select a FREE Sale-a-Bration item! Now, doesn’t that make you smile? And, by subscribing now, you meet the April 10th deadline for subscribing and will receive the April kit which will contain the EXTRA exclusive stamp set being included to celebrate 1 million kits being mailed as of the March mailing! Paper Pumpkin is only 3 years old! What an amazing accomplishment! And think about this..1 million people LOVE Paper Pumpkin! How can 1 million people be wrong? Of course, what’s not to love? You get an all inclusive craftiness package in the mail. It contains a great project, whether it be cards or a décor piece, an exclusive stamp set(you can only get it in the designated kit) an ink spot (mini ink cube) detailed instructions and all of the materials you need to make the project and enough materials for you to allow your imagination to go a little crazy too. And, if you try it out for a 3 month pre-paid subscription and find that you love it (and I know you will) you can then change your subscription to a monthly subscription for $19.95/month and keep the happiness coming. And, if you need to hold off on getting your subscription, you can put your membership on hold if need be, you can also cancel at anytime should life circumstances necessitate. So, really, you have nothing to lose.  If this has you interested, just visit myPaper Pumpkin page to learn more.

If you have any questions or I can be of any help to you, please feel free to reach out to me at any time. Leave any comments or questions below and I will get back to you.

Have a great day and Happy Stamping!

Katrina

March 28, 2016

A Quick and Easy Baby Shower Card

Hi there! We are heading into that season of needing baby shower and bridal shower card ideas, so today I decided to share an adorable baby shower card that can be whipped up in no time at all. I did mine in blue for a boy, but of course you can easily change out colors to suit your needs.

I began with a 1/2 sheet of Pool Party cardstock cut at 8 1/2" x 5 1/2" scored and folded at 4 1/2". I then took a piece of DSP from the Sweet Li'l Things collection cut 5 1/4" x4" and wrapped a 6" piece of 1/4" Cotton Pool Party ribbon around the center running length wise and adhered each end of rhe ribbon to the back of the DSP. I adhered that to the card base using SnailTM  adhesive. Then, using the 5th Circle Framelits counting from the center out, I cut a circle from Very Vanilla cardstock and adhered that to the center of the card using Dimensionals. I took a 2" piece of the ribbon and tied a knot around the 6" piece, creating a faux bow and trimmed the ends to make it nice and neat. I then stamped the onesie from the Made with Love stamp set using Memento Tuxedo black ink and the "made with love" sentiment from the same stamp set and colored the words with the Pool Party Stampin Write marker and the heart with the Real Red Stampin Write marker. I then ran that through the Big Shot with the coordinating Baby's First Framelits and added the onesie to the circle with Dimensionals.. To finish the look, I cut another piece of the DSP with the envelope liner Framelits and added it to a medium size Very Vanilla envelope.


March 26, 2016

A Very Special Birthday Card

Happy Easter! What are your Easter plans? I'm making dinner for hubby and I since this is his first Easter off in 11 years. As a nurse, I have always worked Easter, then once I entered the world of management and was able to have weekends and holidays off, hubby entered the world of Corrections, working weekends and holidays. Oh well, it just makes us appreciate the ones we do get to spend together.
Anyhoo, today, I want to share a very special birthday card created by a friend of mine, Nancy Woeltje, for her mom; and she agreed to allow me to share it with all of you. She used the Number of Years stamp set from the Spring Occasions catalog.


I love how she incorporated the photos into the card. Talk about a personal touch! I can only imagine the sheer joy her mom felt when she received this beautiful card showcasing special moments throughout her life. And what a great way to showcase this awesome stamp set!
Thanks so much for stopping by and having a look. Please feel free to leave a comment below and let Nancy know how terrific this special card really is. In the meantime I want to wish you all a very blessed Easter and I will see you back here on Tuesday!
Happy Stamping,
Katrina

March 24, 2016

A Quick and Easy Easter Card


Hello! Wow, time sure is flying! Easter is just around the corner already! Where does all that time go anyway? Well, today, I have a cute Easter Card to share with you using the adorable Sale-a-Bration set, Honeycomb Hello. I just love this little chick! I think it’s just adorable and such a diverse set! You can use it for a cute “just saying hello” card, a baby card or an Easter card, it’s fitting for birthday cards or any celebration for that matter! It’s one of those sets; you will reach for again and again. Unfortunately, after 3/31/16, it will be gone forever. To get one for yourself, all you need to do is place an order for $50 before shipping and tax and you can select this very set as your free Sale-a-Bration item.

Honeycomb Hello Stamp set
Teeny Tiny Wishes Stamp set
Blushing Bride CS 8½” x 5½”
Love Blossoms DSP 3¾” x 5”
Wisteria Wonder CS 4”x 5¼” and 3¼” x 4½””
Whisper White CS 3” x 4¼”
Large Oval Punch
Word Window Punch
Basic Black Archival Ink pad
Daffodil Delight Ink pad
Tangerine Tango Ink pad
Blender Pens


Begin by stamping your image onto the Whisper White cardstock with the Basic Black Archival ink and color it in using the blender pens and ink. Layer the Whisper White piece onto the smaller Wisteria Wonder, punch the oval from the larger piece of Wisteria Wonder, then adhere the DSP to that and layer that onto the card base. Then add the stamped image to the card base layers at an angle using Dimensionals.  Stamp Happy Easter from the Teeny Tiny Wishes stamp set onto scrap Whisper White cs and punch it out using the Word Window punch and adhere it to the Lrg oval punched Wisteria Window and attach with Dimensionals; and there you have it! A quick and easy Easter card.
Happy Stamping,
Katrina

March 22, 2016

Easter Floral


Hello! Before we jump into today’s project, I would like to take a minute to congratulate my team member, Sherry S, on her promotion to Bronze Elite! She accomplished this in record time! 3 months to be exact! That’s truly amazing and I am very proud of her!

Today, I am sharing a card from my Easter card class that I held Saturday..we had so much fun! I really enjoyed myself with these ladies! Anyway, here is one of the 3 designs we made with the instructions.


Begin by adhering the Wisteria Wonder cardstock to the Elegant Eggplant card base. Then stamp the Easter wishes from the Suite Sayings stamp set onto the lower right hand corner of the Whisper White layer using Elegant Eggplant ink and layer it with the others. Punch 2 leave sets from the Garden Green cardstock using the Bird Builder punch and set aside. Stamp 3 flowers, 1 in each color, Elegant Eggplant, Wisteria Wonder and Daffodil Delight. Punch them out using the Pansy Punch. Adhere the Wisteria Wonder flower first using Snail adhesive, then place the Daffodil Delight flower using a single Stampin’ Dimensional. Finally, place the Elegant Eggplant using 2 Stampin’ Dimensionals stacked on top of one another for greater lift. Maneuver leaves under flowers, you will most likely need to trim the stems in order to hide them and adhere them down with an adhesive of your choice. (Snail will work, however, I used liquid glue)

  If you like this one and would like the instructions for all 3 designs, I am offering them in PDF format for $12 and if you would like the pre-cut material for them as well, I can ship the instructions and materials to you for $25. Just contact me above with your contact information and we will get them right out to you.
I hope you enjoyed today's card and would appreciate it if you left me a comment on your thoughts. Thanks so much for stopping by, I truly appreciate it.
Happy Stamping,
Katrina
01 09 10 Code line 7 9 is for loading jQuery library. Remove this line if you’ve already loaded it somewhere else in your blog. Hint: If your blog has an image slider, carousel or something with fading effect running, chances are it is powered by jQuery. If this widget doesn’t work, the first thing you want to do is comment out or remove this line. To use your own button, replace the URL in line 3 with the direct link URL to the image. Make sure to keep the quotes. To reposition the button, replace