November 28, 2015

Quick and Easy Gift Card Holders


I hope you all had a wonderful Thanksgiving. I got to do it twice. Thursday I spent the day with my mom and dad and dinner with them since hubby had work. We had a great day together, then Friday, while the masses were out shopping til they dropped, I cooked a complete turkey dinner for my husband so he could enjoy a Thanksgiving dinner. 

Wow, is it me or is Christmas coming at full speed ahead or what? Did you realize Christmas will be here in 28 days? Yep, that’s right, 28 days until Santa and his eight Reindeer arrive bearing all those gifts. Will you be ready? I’m working on it. 
Today, I have a quick and easy gift card holder for you. Yes, really, you can whip up a dozen of these in no time.

Start with a medium Whisper White envelope and score it down the middle.

Cut the flap through the middle and tuck the right half into the envelope and then adhere the left side down. It should look like this:


It is in the right side you will slip your gift card.

You will then need a 2 ¾”x5 ¼” piece of Designer Series Paper. I used paper from the Merry Moments Designer Paper Pack, but you can use whatever paper you like. Now adhere that to the front of the envelope turned gift card holder.

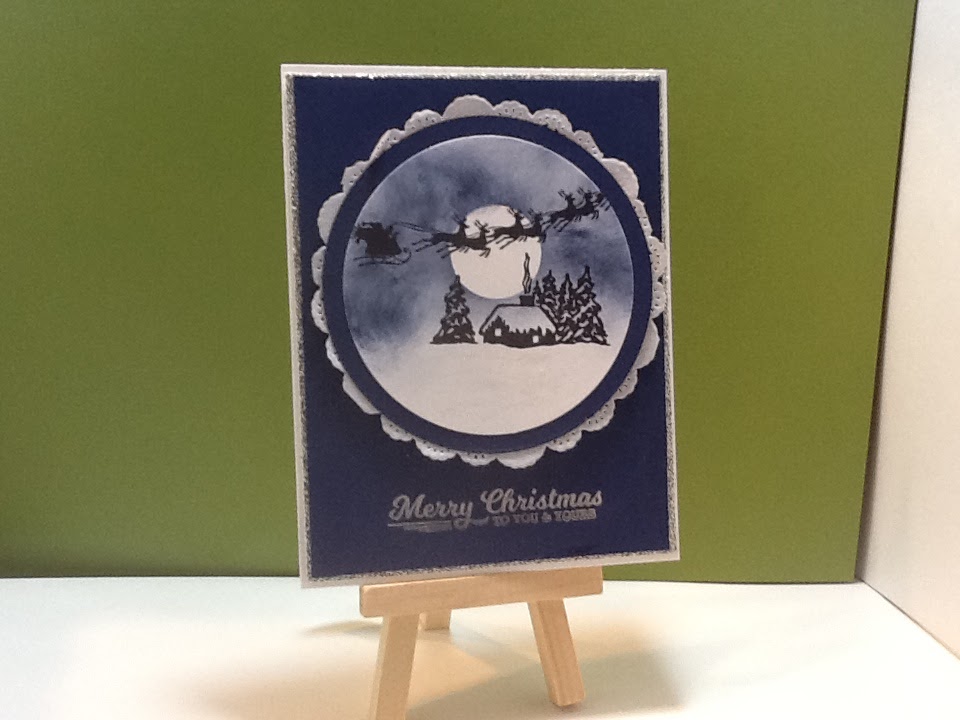
Using a scrap of Whisper White cardstock I stamped the Christmas Image from the Among the Branches stamp set using Cherry Cobbler Ink and punched the image out with the 2” circle punch and punched out a scrap piece of Crumb Cake using the 2 3/8” scalloped circle punch and adhered the  two together. I then wrapped a 16” piece of Cherry Cobbler ribbon (retired) around the card holder  and tied it into a ribbon off to the side and placed the punched image over the ribbon using 2 Dimentionals straddling over the ribbon.

There you have it, a quick and easy gift card holder. Change up the images and the paper and ribbon for a completely different look. How about for a birthday? Lots of ideas and options. Go ahead and give it a try.


Thank you for stopping by. Please leave a comment and let me know you were here and what your thoughts are. Happy Stamping!
Built for Free Using: My Stampin Blog

November 21, 2015

Feed a Cold, Starve a Fever?


I never could get that wives tale right? Who knows it? Please share! Anyway, I decided to “feed a cold” and made these cute Get Well cards. I love this stamp. It’s in the Annual catalog and is a singular wood block stamp and it makes me think of chicken soup every time I look at it so this is what I came up with and wanted to share it with you.

So, I started with a sheet of Island Indigo cut to 5 ½”x8 ½” scored at 4 ¼”, I added a piece of the Island Indigo designer paper from the Regals paper pack (the paper I used is retired, however there is a new pack available with fresh designs) cut at 5 ¼”x4” and I round the 2 opposing corners, top right and bottom left of the card base and the layers.

I stamped the image onto a piece of Whisper White cardstock cut at 4 ¾”x3 ½” using Momento Tuxedo Black ink pad and I masked off the heart in the center of the bowl with a 1” circle I punched from a post-it note to avoid getting black ink on it. I then colored the heart in using the Island Indigo Stampin’ Write marker, I huffed on the stamp, and stamped the image onto the white cardstock. I then colored the “soup” with the Hello Honey Stampin’ Write marker and the rest of the image was colored using the Rose Red Stampin’ Write Marker. I adhered that down to the designer paper layer after rounding the apposing corners to match the others and then attached them to the front of the card base. I then added 3 Rose Red Candy Dots to the bottom right corner.

I cut a second piece of Whisper White cardstock 5 ¼”x4” and added to the inside of the card and stamped the get well sentiment from the Fabulous Four stamp set, also in Momento Tuxedo Black ink.

I created the pocket for the inside front cover using a piece of Island Indigo cardstock cut at 3 ¾”x5” and scored 3 sides at ½” and ¾” using the Stampin’ Score board. I folded all of the score lines and cut away the “corners” created by the score lines, added adhesive (I used Fast Fuse, my favorite adhesive) and attached the pocket to the inside front cover. I popped a packet of instant Chicken Noodle Cup-o-Soup into the pocket and there you have it, a heart warming, cold feeding get well wish for someone special.  

Thanks so much for stopping by, I hope you like today’s card. Please leave me a comment and let me know what you think. Happy stamping!


Built for Free Using: My Stampin Blog


November 17, 2015

Scraps! Scraps! Everywhere Scraps!


Are you over-run by scrap cardstock? Do you hate to reach for your scraps when you need just a small piece? Do you find it just easier to cut another full size sheet rather than look through that pile just to find the right size and color? If your answer is “yes”, and I’m sure for many of you it is, then you have come to the right place!

I have been there! Up until very recently that is. Now, I don’t claim to be a professional organizer, nor do I profess to be a great organizer, but I do keep trying new ideas until I find one that works for me, and finally I have found what works for me and I am now consistently reaching for my scraps to find what I need BEFORE I cut another full size piece of cardstock!

I can’t tell you how many things I had tried that just didn’t work for me because it would be too numerous to count; just know that they did not work for me. You see, for my workflow, I need my supplies conveniently located and easily accessible and organized. If I need to paw around too much, that doesn’t work and only causes me stress and aggravation…no good for a crafter! Our crafting is supposed to bring relaxation and joy right? So I would just cut more cardstock and make MORE scraps to store. I couldn’t bear to throw away a perfectly good piece of cardstock but I would never use it because it was too hard to find or too time consuming to find it. Hence, my continued search for what would work for me.

As I mentioned, I did finally find a simple system that worked for me and I wanted to share it with you. Now, I understand this may not work for your space and workflow, however, I find it works really well for me so here it is:


The best part…it is so simple it’s crazy! I just labeled the manila folders with the color names and I grouped “like” colors together, like Basic Black and Basic Gray with Smoky Slate in one. I did make a separate folder for Whisper White because I always have lots of white scraps. I placed all the folders standing up in a plastic “tote” and I can not tell you how well this has been working for me. I have been using this “system” for just over a month now and I am finally using up my scraps! It might look a little messy here because I was actually working when I took these shots, but now, when I need a ½ sheet or smaller, of whatever color I need, I pull the folder containing the color I need and quickly leaf through the scraps to see if there is a piece that I can use, and most of the time there is. I’m no longer wasting my cardstock and feel that I am getting much more value from it. So, if you too are struggling to find a convenient storage solution, give it a try. It’s inexpensive…I had everything laying around the office/craft room and I just repurposed them.

If you give this a try, please leave me a comment and let me know how it’s working for you. In the meantime, Happy Stamping!

November 14, 2015

Those Dirty Little Photopolymer Stamps!


Have you gone to your craft room to make some cards or other paper craft, pulled out your favorite photopolymer stamp set, only to be disappointed and dismayed to find that it will no longer stick to your clear block? I know I have…it’s a sure sign of all the lovin’ you’ve been giving that set! And I have a tip for you to fix that issue!

First, get a bowl of warm soapy water. I like to use Dawn Dishwashing liquid, I’m sure any will do, I just happen to prefer the blue stuff for my pots and pans so that is what is in my kitchen. Anyway, drop those dirty little stamps right into that bowl. Now let them sit for a minute or two. I like to swish them around a bit too. Then I take a soft cloth and wipe off the backs of the stamps with it and place them face down onto a towel and allow them to dry. I wouldn’t suggest drying them with the towel as you don’t want to transfer any lint onto them.

At this point, I also clean my clear blocks and to be honest, my favorite way to clean them is with hand sanitizer and a terry cloth. The hand sanitizer does an amazing job of cleaning the blocks. It removes any sticky adhesive residue and cleans any dirt and oils and ink from them too. I use the terry as a soft scrubber and that works well for me.

Now that you have cleaned and dried your stamps and your blocks, you should have perfectly “sticky” photopolymer stamps again. I hope you found this helpful. If you have any questions, please feel free to ask below in the comments section.

Have a great day and Happy Stamping!

November 10, 2015

Peaceful Pines


There is some truth in that stamp name. You can often find peace and solace walking through the woods, observing Gods amazing creations, and around here, there are lots of pines. I don’t know about you, but I love walking through the woods, of course, my husband and I pretty much live smack dab in the middle of the woods here in Upstate NY, so I guess I should love it.

Anyway, I created this card using the Peaceful Pines stamp set and coordinating framelits. It’s pretty simple and I really like how it came out.


All supplies used can be found below.
Instructions: I started with a Whisper White card base cut at 5 ½”x8 ½” scored at 4 ¼” I stamped the detailed pine tree onto a scrap piece of Whisper White with the Mossy Meadow ink and cut it using the coordinating framelit. I also cut a scrap piece of Smokey Slate using the same framelit. I then cut a scrap piece of Real Red cardstock using the Circle framelits (the 4th one counting from the outside in) and I cut a piece of DSP from the Merry Moments paper stack (found in the holiday catalog) to 2”x5 ¼”

Once I had all of my pieces cut and stamped, I adhered the DSP using snail adhesive ( I ran out of my favorite Fast Fuse – I can’t wait for my order to arrive!) I then layered the Real Red circle a little to the right of center again using Snail adhesive. I then cut a Tea Lace Doily in half, then folded that in half and tucked it in behind the Real Red circle. I placed the Smokey Slate tree onto the Real Red circle, also with Snail and the stamped tree I placed a little lower than the other and popped that up on Dimentionals. I stamped the verse, also from the Peaceful Pines stamp set in the lower right hand corner of the card with the Mossy Meadow Ink.

Thanks so much for stopping by and taking a look. Please leave a comment below and let me know what you think.

Have a great day and Happy Stamping!
 
Built for Free Using: My Stampin Blog


November 7, 2015

A Cozy Christmas


Well, I hope wherever you are, you have been experiencing the beautiful fall weather that we have been enjoying here in the Northeast. Unusually warm temperatures and lots of sun…not normal this time of year in these parts but I sure will take it and be grateful; it won’t be long and old man winter will be here putting us into the deep freeze. Brrrr, I shutter at the thought, however, A Cozy Christmas does warm me up. I love this stamp set and couldn’t wait to use it.


Here is my take on this beautiful stamp set and how I did it:

I cut an 8 ½”x11” Whisper White CS at 5 ½”x8 ½” and scored at 4 ¼”

I cut the 12”x12” Glitter paper to 5 ¼”x4”

Night of Navy panel is 5”x3 ¾”

Using the Circle Framelits, counting from the outside in, I cut the Night of Navy with the 3rd framelit and the Whisper White with the 4th framelit.

I stamped the cabin from the A Cozy Christmas stamp set onto the Whisper White circle using Basic Black Archival Ink. I punched a 1” circle from a sticky note to create a mask for the moon and placed it over the smoke stack created by the cabin stamp; I then sponged Night of Navy ink to the “sky” area around the cabin. I stamped the flying Santa Sleigh from the stamp set using the Basic Black Archival Ink, added glue from the glue pen to the snow covered roof, the ground and the snow covered trees and sprinkled with the dazzling diamonds.

I adhered the Night of Navy panel to the Glitter paper using Tombow Mono-adhesive (green glue) and adhered them onto the Whisper White card base using the same glue,

Once the Dazzling Diamonds glitter was dry, I adhered the stamped image to the Night of Navy circle with Snail adhesive, and then adhered them to a paper doily with the same. I then popped them up with Stampin’ Dimentionals and adhered them to the card front.

The sentiment that I used comes from the stamp set, To You and Yours Too, also from the holiday catalog. The ink that I used is retired, it is the Silver Metallic Ink from last year’s holiday catalog, however, it is easily found at your local craft stores. That’s it, very simple and yet elegant with all the sparkle. So, what do you think? Leave me a comment below and let me know what your thoughts.

Thanks again for stopping by my little corner of the web and I wish you all a wonderful day.

Happy Stamping!
Built for Free Using: My Stampin Blog


November 3, 2015

Stamping on Tile


I shared a photo of some of the tiles I had stamped on Facebook, but wanted to share them with you here with a mini tutorial on how I made them. These make great little Christmas gifts and are rather inexpensive to make.
 

I started by visiting my local Lowes Home Improvement store to purchase the tile. What I found and worked well for me was a box of 9 Tumbled Granite tiles. Some of the tiles were as smooth as can be and were easily stamped directly onto the tile, while others were lumpy and bumpy with little moon craters throughout. Those lumpy bumpy ones, I couldn’t stamp directly onto them so to get around that, I stamped my pattern onto cardstock that I cut using the square framelits and my Big Shot. I then colored the images and adhered them to the tiles using ModPog after cleaning the tiles with a soft cloth to remove any loose dust. The ModPog worked beautifully. It not only adhered the cardstock to the tile, but it also provided a protective coating so that the tiles can be used as  coasters and holds up to any moisture that may occur due to condensation from cold drinks. In order to use ModPog, you will need to stamp your image using Momento Tuxedo black ink and color your images with an alcohol based marker such as Copic or Spectrum Noir. I will be honest, I used the discontinued Stampin’ Up! Blendabilities, but any alcohol marker will work; then I added a heavy coat of the ModPog. If you try to use a water-based marker or ink, it will run when you apply the ModPog…..don’t ask how I know this!
 

Now, for the smooth tiles, I just wiped them free of loose dust and used Stazon Jet Black ink to stamp the image directly onto the tile. I allowed the ink to dry for a bit and set it with my heat gun. I then colored in some of the images with my Stampin’ Write markers. These are a water-based ink marker, however, I sealed these with an acrylic spray sealer and there was no running of the color so it worked out fine.

I hope you enjoyed this and give it a try for yourself. Please leave me any comments below and let me know what you think.  In the meantime, happy stamping!
Built for Free Using: My Stampin Blog


01 09 10 Code line 7 9 is for loading jQuery library. Remove this line if you’ve already loaded it somewhere else in your blog. Hint: If your blog has an image slider, carousel or something with fading effect running, chances are it is powered by jQuery. If this widget doesn’t work, the first thing you want to do is comment out or remove this line. To use your own button, replace the URL in line 3 with the direct link URL to the image. Make sure to keep the quotes. To reposition the button, replace