Showing posts with label dsp. Show all posts

July 23, 2016

An Elegant Thank You

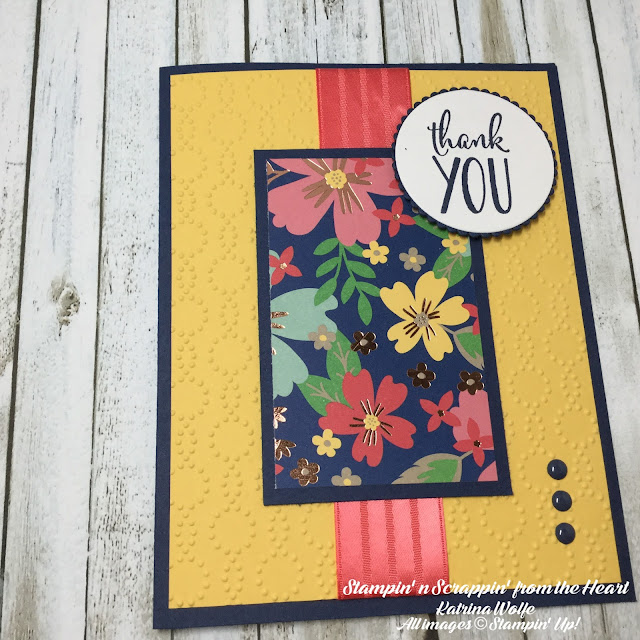
Happy Saturday! I hope you are enjoying what looks to be a perfect weekend? Blue skies abound here! Anyway, today, I wanted to share with you a thank you card I created. I actually created this one for the sketch challenge taking place on my Facebook page. Yes, you should check it out and come join us, we have LOTS of fun. Anyway, I was really happy the way it turned out and wanted to share this with you. One of the reason's I love this card so much is that it really show cases just how gorgeous the Affectionately Yours Designer Series paper is, for real. The one that I used has the copper flowers scattered among all the other beautiful colors and it just sparkles! I am really loving the copper trend this season.
So, what do you think? Ok, here's how I did it. I started with a Night of Navy card base, 8 1/2"x 5 1/2" and scored it at 4 1/4" for a standard A2 size card. then I cut a piece of Daffodil Delight at 4" x 5 1/4" and ran it through the Big Shot with the Elegant Dot's TIEF to give it some texture. I then wrapped a piece of retired (insert sad face) Watermelon Wonder ribbon through the center and adhered it in the back with some scotch tape then adhered the entire panel to the card front with Fast Fuse. I then cute a piece of this GORGEOUS Affectionately Yours DSP 2" x 3" and matted it onto another piece of Night of Navy cut 2 1/4" x 3 1/4" and added that to the card over the top of the ribbon. I just used my Fast Fuse (I love this stuff!) I then stamped Thank You from the Happy Happenings stamp set in Night of Navy ink onto a scrap piece of Whisper White and cut it out using my Layering Circles Framelits and matted that onto a scalloped Night of Navy circle, also cut using the Layering Circles Framelits, and then added that to the top right corner of the DSP using Stampin' Dimensionals. Then just to add a little sumthin' sumthin', I added 3 little enamel shapes from the Regals package (Night of Navy)
And that my friends, completes the card! The picture just doesn't do the DSP any justice at all. This is one you have to see up close and personal in order to appreciate just how beautiful it really is. I do also want to remind everyone of the Bonus Days taking place for the month of July. If you place a $30 order with me using Hostess Code: FT9YEUVC, I will send you the materials for my Christmas in July Class along with the PDF instructions and access to an exclusive video to follow along. The kit provides enough material to create a total of 9 cards, 3 each of 3 designs. And, Stampin' Up! is giving away a $5 coupon code for every $50 spent for you to use on ANY purchase in August! And there are no limits on how many $5 coupon codes you can collect! Just don't lose them. Print them, write them down and save the emailed code. You do not want to lose them....they're quite valuable! (wink) So, visit my store today and and begin earning great things! (All kits will be mailed out by 8/5/16 for anyone that places a $30 or more order)
Happy Stamping!
Katrina

April 14, 2016

Exciting Times


It’s that time of year again. Demonstrators from all over the US and Canada will be converging onto Salt Lake City Utah for Stampin’ Up! On Stage celebration. Unfortunately, I am unable to attend this year. Maybe next time. But with this time of year, and the coming of the new catalog go-live in June, we’re all gearing up for the release of the retirement list that will come out  on Monday (insert sad face) but with that comes the excitement of what new things we will have to look forward to. And that is what I focus my energy on, being positive regarding all the wonderful NEW things that will be available rather than focus on what we will be losing.

But on that note, I do want to remind you that we will, without a doubt, lose the 2014-2016 In Colors and all of the DSP and embellishments containing those colors. And if you are anything like me, you will have to admit that some of these colors are the absolute most gorgeous colors ever developed and I am so sad to see them go away. These are extremely popular colors and if you need or want to stock up before they’re gone, you need to do it now. I can’t tell you how many times I have had costumers and myself included miss the opportunity to replenish a color supply because once something is on the retirement list and it sells out, it’s never to be seen again, EVER. Trust me, I missed out on stocking up on my beloved Pistachio Pudding cardstock last year (insert sad face, a few tears and a banging head) I thought I had time and waited for the retiring list to come out and figured I would put in one last order for all of the few things I wanted at once and it turned out to be a bad idea and I missed out. I am telling you this because I don’t want that to be you.

http://www.stampinup.com/ECWeb/ItemList.aspx?categoryid=101701&dbwsdemoid=2124811
Another thing going away after Monday is the Weekly Deals program.  Stampin’ Up! has decide to go to a new, less frequent program, “Special Offers”. With this, they will be able to offer greater discounts due to the decrease in frequency of the program and offer more product during the offers. We should be seeing these Special Offers every few months , so, keep your eyes and ears open for when these promotions begin. In the meantime, be sure to check out the final weekly deals for this week. They have some fantastic offerings and this is the perfect opportunity to take advantage.  Just click here or click the photo and it will take you to the weekly deals page of my on line store.
http://www.stampinup.com/ECWeb/ItemList.aspx?categoryid=100100&dbwsdemoid=2124811
 

Well, that’s all for now. Have a great day and happy stamping,

Katrina

March 28, 2016

A Quick and Easy Baby Shower Card

Hi there! We are heading into that season of needing baby shower and bridal shower card ideas, so today I decided to share an adorable baby shower card that can be whipped up in no time at all. I did mine in blue for a boy, but of course you can easily change out colors to suit your needs.

I began with a 1/2 sheet of Pool Party cardstock cut at 8 1/2" x 5 1/2" scored and folded at 4 1/2". I then took a piece of DSP from the Sweet Li'l Things collection cut 5 1/4" x4" and wrapped a 6" piece of 1/4" Cotton Pool Party ribbon around the center running length wise and adhered each end of rhe ribbon to the back of the DSP. I adhered that to the card base using SnailTM  adhesive. Then, using the 5th Circle Framelits counting from the center out, I cut a circle from Very Vanilla cardstock and adhered that to the center of the card using Dimensionals. I took a 2" piece of the ribbon and tied a knot around the 6" piece, creating a faux bow and trimmed the ends to make it nice and neat. I then stamped the onesie from the Made with Love stamp set using Memento Tuxedo black ink and the "made with love" sentiment from the same stamp set and colored the words with the Pool Party Stampin Write marker and the heart with the Real Red Stampin Write marker. I then ran that through the Big Shot with the coordinating Baby's First Framelits and added the onesie to the circle with Dimensionals.. To finish the look, I cut another piece of the DSP with the envelope liner Framelits and added it to a medium size Very Vanilla envelope.


March 19, 2016

A Fast and Easy Thank You


Here is a card that I made that turned out to be a pleasant surprise for me. It happens to be a card that I did for the sketch challenge that is going on over on my Facebook page. (If you haven’t stopped by to check it out, you really should, we are having lots of fun over there) Anyway, after I had posted the sketch, and I sat down to look at it, I completely went blank! Literally, I had NO idea on what I was going to make to fit this sketch. So, I started by grabbing some scrap DSP I had lying on my desk and from that point forward my card was born. It falls into the category of quick and simple and who doesn’t love a card that’s quick and simple, right? So, here it is:
 

Supplies needed:

Birthday Bouquet DSP 4 5/8” x 2½” and 5½” x 1¼”
Whisper White Cardstock 8½” x 5½” scored at 4¼” and scrap large enough to punch a 2½” circle  
Mint Macaron Cardstock 5½” x 3/8”
Mint Macaron Ink pad
3 pink buttons from the Subtles Buttons collection
2 ½” Circle punch
Hostess Stamp set: A Whole Lot of Lovely
Snail adhesive
Stampin’ Dimensionals
Glue Dots
Rhinestones


Begin by adhering the DSP cut at 4 5/8” x 2” to the upper portion of the card base using Snail adhesive, then add the Mint Macaron strip followed by the remaining DSP (I used the same “piece” of DSP and just flipped it to use the other pattern) I then stamped the Thank You from the stamp set using Mint Macaron ink onto the scrap Whisper White cardstock and punched it out using the 2½” circle punch and popped it up on Dimensionals and added it to the card. I then secured the 3 pink buttons using Glue dots. And that completed this card. Fast, easy and really packs a punch!

 
What do you think? Please leave me a comment and let me know your thoughts. And thank you so much for stopping by to take a look around.

 
Happy Stamping,

Katrina


March 15, 2016

It's a Collage of Color


Hello, today, I have a card for you that I made for the weekly sketch challenge going on over on my Facebook page and wanted to share. Once again, I ventured outside my usual Subtle colors that I naturally gravitate to, and came up with this. So, what do you think?
 

Supplies Used:

Basic Black 8 ½” x 5 ½” scored at 4 ¼” and folded for the card base.

Botanicals Garden DSP panel cut 2 ¾”x 5”

Basic Black layer cut 3 ¼”x 4 ¾”

Botanical Gardens DSP cut 3”x 4 ½” (I just turned over the DSP and used the backside of the same 12”x12” I had already cut for the 1st layer)

Basic Black layer cut 2 ¾”x 3 ¾”

Whisper White layer cut 2 ½”x 3 ½”

Basic Black cut 3 ¼”x 1 ¼”

Whisper White layer cut 3”x 1”

Scrap Whisper White to stamp and punch flowers from

Beautiful Bunch Stamp set

Butterfly Basics Stamp set

Petite Petals punch

Candy Dots (Neutral Collection)

Cajun Craze Ink

Mossy Meadow

Hello Honey

Snail Adhesive

Glue Dots

Stampin’ Dimensionals

 
I began by adhering the yellow pattern of the Botanicals Garden DSP to the right of the card base using Snail adhesive. I then took the second piece of the DSP and adhered that to the Basic Black layer and adhered that to the center of the card, then, I inked up the Honeycomb image from the Butterfly Basics stamp set, using Hello Honey ink, and I stamped off then stamped it onto my Whisper White panel. I did that a total of 3 times to fill the panel. I then used the fern image, also from the Butterfly Basics stamp set with Mossy Meadow ink. I stamped down with full ink then without lifting the bottom of the stem, I slightly pivoted the stamp getting a lighter and lighter effect. Then, using the Cajun Craze ink and the small flower from the Beautiful Bunch stamp set, I stamped a total of 3 images on to scrap Whisper White and punched them out using the Petite Petals punch and added them to the panel using glue dots and adhered the panel to the Basic Black layer and adhered that to the right side of the card again using Snail. I then stamped the Happy Birthday sentiment from the Butterfly Basics stamp set with the Cajun Craze ink and adhered it to the Basic Black layer and adhered that to the bottom of the card using Stampin’ Dimensionals and added three Basic Black candy dots.

 
I hope you enjoyed this card, please leave me a comment and let me know your thoughts. Have a wonderful day and see you Thursday!

01 09 10 Code line 7 9 is for loading jQuery library. Remove this line if you’ve already loaded it somewhere else in your blog. Hint: If your blog has an image slider, carousel or something with fading effect running, chances are it is powered by jQuery. If this widget doesn’t work, the first thing you want to do is comment out or remove this line. To use your own button, replace the URL in line 3 with the direct link URL to the image. Make sure to keep the quotes. To reposition the button, replace