Showing posts with label ink blending. Show all posts

March 17, 2023

Double Masking to Create a Spotlight

double_masking_kkh

Hey Friends,

Today's card features a fun technique of masking your card twice to create a fun "spotllight" for your card. Here, I first masked off the center of the panel with masking paper that I had die cut with a circle die from the Layering Circles dies. I then used my blending brushes and Starry Sky Ink and Tahitian Tide Ink to blend my background. When I removed the mask, I had a nice bright white circle with a beautiful blended background. I then took the remaining masking paper that I had cut the circle from and laid that down over the panel ensuring to line up the circles while protecting my blended background and I stamped my Sentiment and my floral images. The colors I used are Starry Sky for the sentiment and Polished Pink for the flowers and the centers and leaves are stamped in Parakeet Party. Then as a final touch, I added some white Baker's Twine that I wrapped twice around and tied into a bow. 

Using the double masking is a fun way to add a spotlight effect to your card. I love how these pretty pink flowers pop here and are spotlighted in this card. Let me know if you give this a try. I'd love to hear. In the meantime, 

Happy Stamping,


Product List

March 15, 2023

Creating a Masked Background - Round 2

masked_circle_background

Hey friends,
Thanks again for stopping by. I have another card featuring an ink blended background, created by die cutting a circle from Masking Paper and masking off the panel used for the card front. I LOVE this technique. As stated Monday, it provides such a beautiful look with a touch of elegance but can also add whimsy in the right situation. This is definitely a go to technique to have in your back pocket. 

Here I cut a sheet of the masking paper down to 4" x 5-1/4" equal to the Basic White card panel and die cut a circle using the Layering Circles Dies from the center of the masking paper. I layered the Masking paper with the Basic White panel and used my blending brushes to add Pale Papaya and Polished Pink ink to the inside of the circle. I then used Memento Black Ink to stamp the sentiment and the foliage from the  Botanical Layers stamp set along with the Sentiment from the same set. Once again, keeping the card super simple. 

Happy stamping!


Product List

August 15, 2022

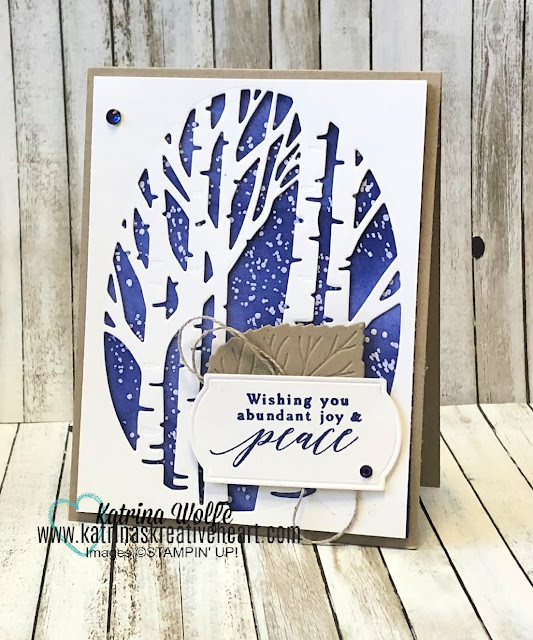
Create a Snowy Background with Emboss Resist Technique


Emboss Resist Perched in a tree

I fell in love with the Perched in a Tree stamp and die set and when I saw the die cut Aspen tree I envisioned a snowy background behind it, so I set out to create just that. Of course the stamp set contains the perfect "speckle" stamp so by creating an emboss resist background using clear embossing powder then Starry Sky ink blended over the clear embossed "speckle", I had my snowy background. 

Emboss resist is one of those techniques we tend to forget about but it can be a real handy technique to have in your arsenal of stamping techniques. Be sure to check out the replay of my Facebook Live if you'd like to see how it's done. It's so easy and can really pack a punch on your card. I LOVE the Starry Sky here with the Basic White. I just looks so pretty together. I will definitely try this one again. 


01 09 10 Code line 7 9 is for loading jQuery library. Remove this line if you’ve already loaded it somewhere else in your blog. Hint: If your blog has an image slider, carousel or something with fading effect running, chances are it is powered by jQuery. If this widget doesn’t work, the first thing you want to do is comment out or remove this line. To use your own button, replace the URL in line 3 with the direct link URL to the image. Make sure to keep the quotes. To reposition the button, replace