Showing posts with label fun fold. Show all posts

July 22, 2019

Memorable Mosaic Buckle Fold Card

Hello and Happy Monday! Another weekend has flown by so fast! But at least the extreme heat and humidity have broke at least for the time being.
Today, I have a fun card to share with you. It's called the Buckle Fold and I'm featuring the awesome Memorable Mosaic stamp set.
I have to be honest, this set did not tickle my fancy immediately. As a matter of fact, I really didn't care for it at all, however, we received the gorgeous Mosaic Mood DSP as an all attendee give away at OnStage in April and I had gotten the coordinating punch as a gift at Center Stage and well, I seem to suffer from the need to have all things that coordinate so I went ahead and got the stamp set, and OH am I so glad that I did!
Memorable Mosaic Buckle Fold Card www.katrinaskreativeheart.com
I love the texture of this set and the whimsy of the mosaic patterns. It totally grew on me and I hope that I can inspire you enough to help it grow on you as well. I have a video tutorial on how to recreate this card and below you will find a downloadable/printable PDF as well. If you try this card out, feel free to share it with us over on my Facebook page, www.facebook.com/katrinaskreativeheart we would love to see what you do. 

If you enjoyed today's card, be sure to join my mailing list where I share lots of free tutorials with you direct to your inbox. You can join right here.
Happy Stamping,


Product List

July 16, 2019

A Double Fun Fold Featuring the Vibrant Vases

Hello and Happy Tuesday! I hope your day is off to a great start! Yesterday was your typical Monday where things get a little crazy but all in all, it wasn't bad, so I anticipate today will be terrific! 
Okay, so if you follow me on Facebook, I promised a clean recording and a downloadable PDF for this Double Fun Fold from Facebook Live...and as promised here it is; you can find the downloadable PDF and video recording below.

The design of this card is perfect for a group to present a recipient with LOTS of signatures and well wishes and it's a lot of fun to make. It's essentially a card within a card!
I'm really loving the Bermuda Bay and Gorgeous Grape together. They just scream, HAPPY! And who doesn't love happy?

I hope you enjoyed today's card. Please feel free to leave a comment and let me know which version of this card you prefer, this one here, or the one featured in the video tutorial? Let me know below. In the meantime, Happy Stamping,


Product List

June 18, 2019

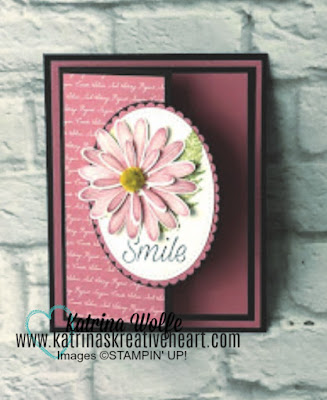
Daisy Lane Fun Fold

Hello and Happy Tuesday evening my friends! It's a beautiful evening here in Central NY. I have my window open with a perfect breeze coming through, listening to the birds sing. With all of the rain and cool weather we've had, it sure is a welcome sight.
Anyway, I have a fun new card to share with you that I created Sunday during my Facebook Live. It's a fun fold using the fun and versatile stamp set, Daisy Lane. I love Daisies and this stamp set is no exception. And this new Medium Daisy Punch kicks it up a whole other notch and paired up with our original Daisy Punch, you're talking "knocks it out of the park" notch!
Daisy Lane Fun Fold
Daisy Lane Fun Fold
To create this card you will need:
Basic Black 4 1/4" x 5 1/2"; 6" x 5" scored at 3 3/4"
Rococo Rose 4" x 5 1/4"; 3 1/2" x 4 3/4"
2019-2021 InColor DSP 2" x 4 3/4"
Whisper White scraps for Daisies and Stitched Ovals
To begin, die cut the largest oval from the Layering Ovals dies from the center of the 6" x 5" piece of Basic Black; then die cut the largest scalloped oval from the the 4" x 5 1/4" Rococo Rose panel and then layer the Rococo Rose onto the 4 1/4" x 5 1/2" Basic Black panel followed by the 6" x 5" panel of Basic Black and finally the 3 1/2" x 4 3/4" Rococo Rose. Adhere the DSP to the front flap of the Basic Black piece, then die cut 2 of the largest stitched ovals from the Stitched Shapes dies collection and adhere one to the inside of the card. This is where you can write your message to the recipient. Next, you will stamp 2 of the largest daisies in Rococo Rose ink and 1 of the small daisies in the same. Punch them out and using your bone folder, gently curl your petals and layer them together so that their petals are off set from each other. I used Glue Dots to assemble my daisy. I then stamped the fern like leaf in Pear Pizzazz onto the stitched oval and added my daisy with a Stampin' Dimensional. Finally, I layered my ovals and adhered it to the front flap of the card, taking care to only adhere the left side so that the card will open freely. As a final touch, I added a fuzzy center using the Perennial Essence Flower Centers.
I hope you enjoyed today's card as much as I enjoyed sharing it. I love how the Rococo Rose looks with the Basic Black and this DSP is AWESOME! I can see myself using a LOT of this stuff, in all of the colors!
Have a great evening, go enjoy the gorgeous evening and thanks so much for stopping by to hang out with me for a bit.
Happy Stamping,


Product List

March 14, 2019

Hello Cupcake Sale-a-bration 2019 Bridge Card

Hey there! Thanks for stopping by again! I'm so glad you are here. I want to share a fun card with you using the Hello Cupcake Sale-a-bration stamp set. I'm really going to be sad when this stamp set leaves us at the end of the month. But, sadly, all great things do come to an end and Sale-a-bration is one of them. It ends on March 31st for another year. So, I do suggest, if there is anything on the Sale-a-bration list that you want, now is the time, because everything is currently "while supplies last" so as supply is depleted, items are being discontinued. Yes, sad it is indeed.
Anyway, today's card is the popular Bridge Card design. And OMG! It's so easy! But so fun!
So, here is my list of supplies with measurements:
Gorgeous Grape CS 4 1/4" x 8"; scored along the 8" side at 1 1/4"; 2 1/2"; 5 1/2"; and 6 3/4" and for the bridge a piece cut 1 1/4" x 5 1/2"
How Sweet It Is DSP 4 pieces 1" x 4" and for the bridge, 1" x  1/4"
Coastal Cabana 2 3/4" x 4"
Whisper White 2 1/2" x 3 3/4" and scraps for the cupcake
Coastal Cabana Ink
Gorgeous Grape Ink
Highland Heather Ink

Fold on all the score lines creating a gate-fold card with the ends folded back. Adhere DSP to the panels. Stamp the sentiment onto the piece of Whisper White CS in Gorgeous Grape and adhere to the Coastal Cabana panel and adhere to the inside center of the card. Then stamp another sentiment directly onto the DSP for the bridge also in Gorgeous Grape ink and layer onto the bridge CS. Using a strong adhesive such as Tear n Tape, adhere the bridge to the outer flaps of the card base, making sure to keep the bridge straight. Next stamp the cupcake wrapper in Coastal Cabana; and the frosting in Gorgeous Grape and Highland Heather. Cut these pieces out using your Paper Snips and add to the bridge with Stampin' Dimensionals.

I hope you enjoyed this quick and simple card and I hope it has encouraged you to try a Bridge card. And if you do, be sure to stop back here and share your results. I would LOVE to see.
And Before I forget, our friends at Stamp n Storage are at it again! They have come up with an awesome solution to our 6" x 6" paper storage! It's brand new today and YOU are first to hear about it! You can check it out by clicking here. And if you use the code 6N8PAPER at checkout, you will get 10% off today only!

Happy Stamping,


Product List
01 09 10 Code line 7 9 is for loading jQuery library. Remove this line if you’ve already loaded it somewhere else in your blog. Hint: If your blog has an image slider, carousel or something with fading effect running, chances are it is powered by jQuery. If this widget doesn’t work, the first thing you want to do is comment out or remove this line. To use your own button, replace the URL in line 3 with the direct link URL to the image. Make sure to keep the quotes. To reposition the button, replace