Showing posts with label aqua painter. Show all posts

January 17, 2017

Window Shopping

Hey all!
I hope you are all enjoying the start of the new week. So far, so good here. I accomplished so much over the weekend that currently, I feel totally caught up for a change. I realize that feeling won't last for long, but for now, I am going to enjoy it!
Anyway, today I want to share a card I made for a friend who is recovering from surgery right now. I happened to see this card in the Occasions Catalog and just fell in love with it, so I decided to C.A.S.E. (Copy and Share Everything) the card. It uses the Window Box Thinlits to create the cut out card front. And I just LOVE the watercolor behind. This was such an easy card to create, And here is how it was done:
Supplies:
Stamp Set: Window Shopping
Paper: Extra Thick Whisper White cut 4 1/4" x 11" scored and folded at 5 1/2"; Watercolor paper cut 4" x 3 1/2"; Whisper White panel cut 4" x 5 1/4"; Pool Party 1/2" x 3 3/4"
Ink: Mellon Mambo; Pear Pizzazz
Misc: Aqua Painter; Stampin' Dimensionals; Big Shot; Window Box Thinlits; Paper Snips; Fast Fuse Adhesive; Die Brush Set

Directions:
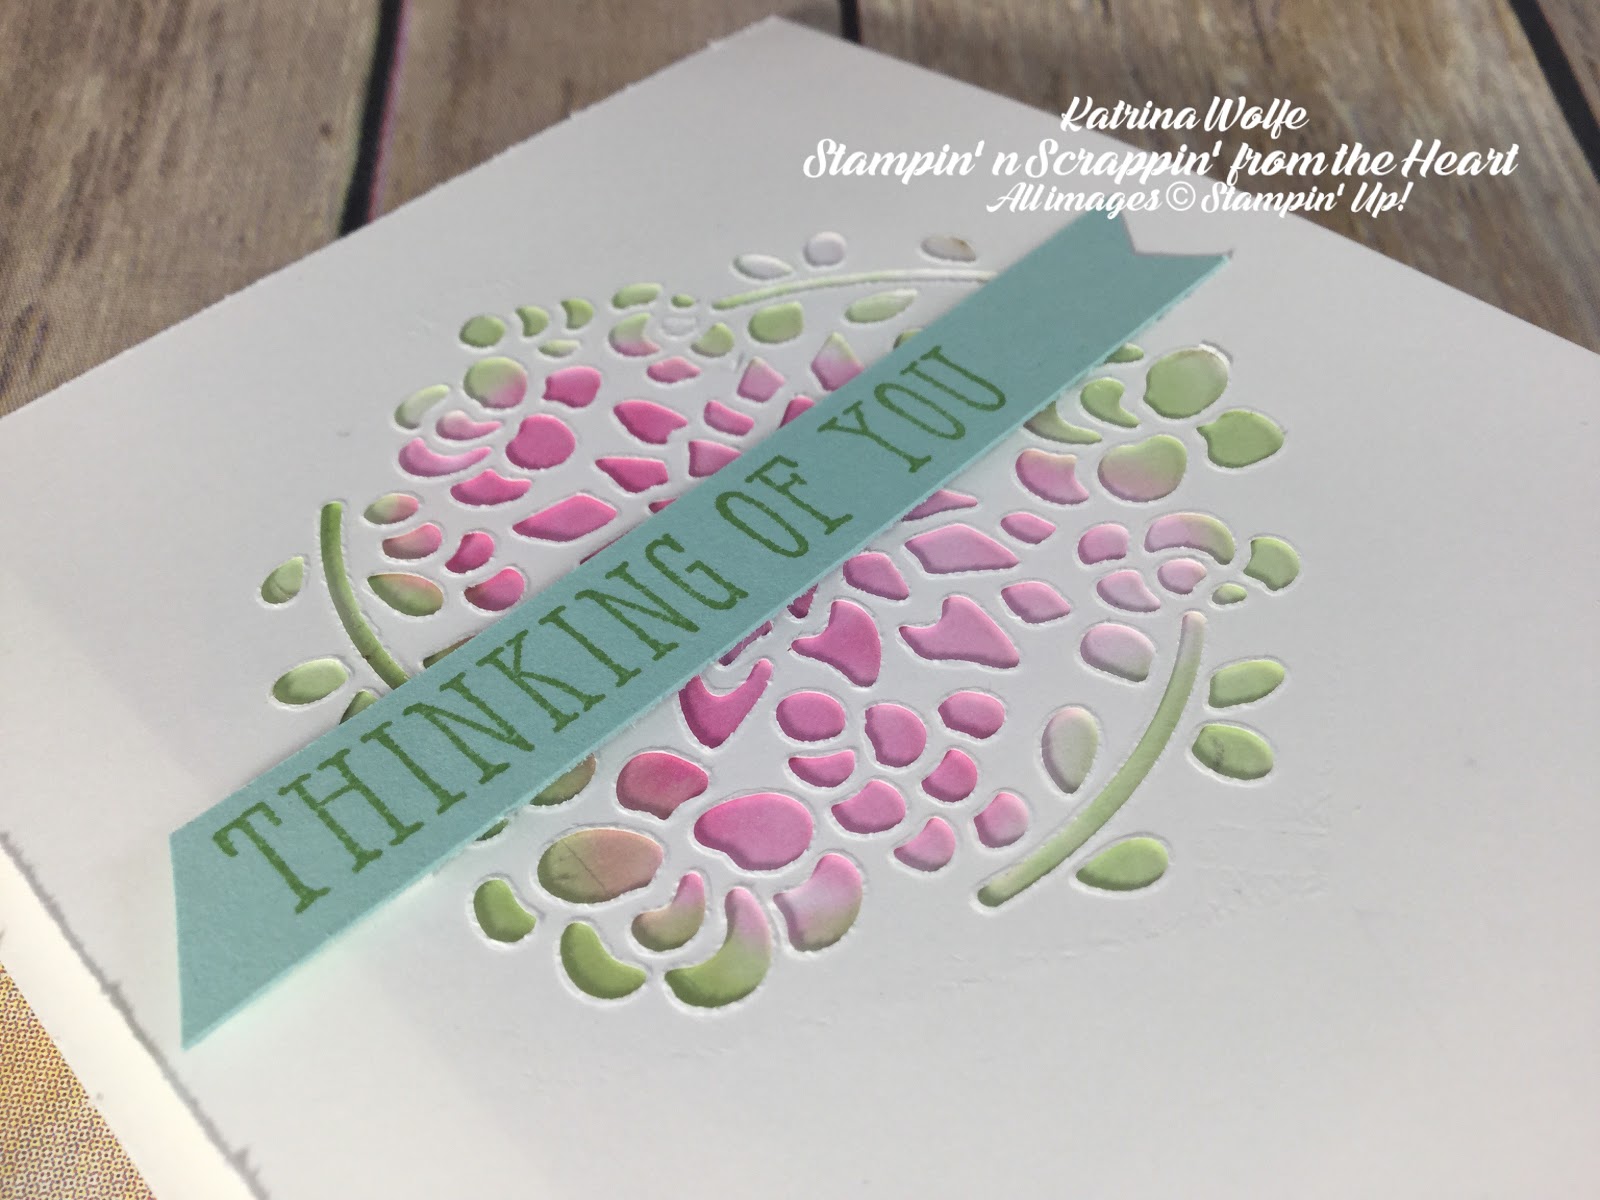
To begin, once I created my card base, I ran my Whisper White panel through the Big Shot with the large floral design thinlit from the Window Box collection and removed the die using the die brush and foam pad. (This worked like a DREAM!)

Next, I lined my Watercolor paper up behind the cut out image and using a pencil, I lightly marked the outer-most parts of the image so that I could be sure to ensure my color extended far enough and I knew I wanted to be able to keep the Pear Pizzazz to the outer edge and that helped with my color placement. I then set my cutout panel aside and went to work on the Watercolor.

Using my Aqua Painter, I soaked my Watercolor paper. Then I began to pick up the Mellon Mambo with my Aqua Painter from a pool of color in my stamp pad lid and literally just "dropped" it onto the center of my Watercolor paper and allowed the ink to spread, and I continued to do this until I was happy with the amount of ink I had. I then did the same process with the Pear Pizzazz, concentrating on the outside perimeter of the paper, catching the edges of the marks I made with my pencil. I then dried the ink with my heat tool. Once it was dry, it was a bit warped, so I used Fast Fuse all around the edge and lined it up behind the die cut panel. I then attached the panel to the card base using Stampin' Dimensionals.

I stamped the sentiment onto the Pool Party piece using Pear Pizzazz ink and using my Paper Snips, I bannered one end and angled the other and attached it to the card using a couple of Stampin' Dimensionals. 


That's it, that is all there is to putting this pretty card together. Now, if you will excuse me, I need to drop this into the mail box so that it makes it's way to the intended recipient. Have a great day and Happy Stamping,


Product List

June 18, 2016

Show some Love


Hello again and Happy Saturday! Here is another absolute favorite of mine from the new catalog, the Sunshine Sayings bundle. The possibilities are endless for this set, but here is just one idea:
 

The card base is Basic Black cut 5” x 10” and scored at 5” to create a 5” x 5” card. The Whisper White layer is 4 ¾” x 4 ¾”. I stamped the “scribble” flower from the stamp set using Versamark ® ink and heat embossed with Whisper White embossing powder a total of 5 times.  I then colored each flower  with my Aqua-painter alternating with Flirty Flamingo ink and So Saffron ink. I then die cut the word Love from Basic Black cardstock for a total of 3 using the coordinating Thinlits and adhered them together to give the word dimension and adhered the entire piece to the card front and then adhered that down to the card base. As a final touch, I “painted” the Love piece with clear Wink of Stella™. And that my friends, completes our card for today.

I truly hope you enjoyed today’s card. I welcome any and all feedback so please feel free to leave me a comment below and wish you all a wonderful weekend.

Happy Stamping,

Katrina

February 20, 2016

So Many Black Inks!


 Hello,
I wanted to take this opportunity and piggy back off of my last post regarding the many different inks and show you the differences among the 3 black inks that Stampin' Up! carries in their line, as each of the inks server a purpose.
First is the water-based dye ink, Memento® Tuxedo Black ink. This ink is formulated to work with alcohol coloring mediums such as Copic® Markers or Spectrum Noir®, however, it doesn’t work especially well with water-coloring as it does react to water and will smear, making for a bit of a messy piece as shown here:
Memento Ink
Using the Aqua-Painter

Adding Alcohol based Ink marker


Next is the Archival Basic Black® ink. This ink is also a water-based dye ink, however, it’s formulation makes it a permanent ink that does not react to water and therefore can be used for water-coloring and it will not smear and get messy, however, it does smear and react slightly with the alcohol inks. As you can see here in the photo, you could probably use the Archival ink with your alcohol based markers if you were careful to remain within the lines because as you see here, there is minimal smearing of the black color.
Archival Basic Black Ink
Water-color with Aqua-painter
Using Alcohol Markers


Last but certainly not least is Stazon® black ink. This is a permanent solvent based ink that can be used on non-porous material such as glass, plastic, acetate and tile just to name a few. It is water proof but does react to alcohol based inks, as you can see here, with the aqua-painter®, the color remains true while the Blendabilities® alcohol marker color blended with the black ink creating a much deeper shade of Daffodil Delight! Because of the solvent base to the Stazon®, you do need to use Stazon® cleaner to remove the ink from the stamp also, otherwise, you will permanently color/stain your stamps and you should never use Stazon® cleaner on your photopolymer stamps as the material used to make photopolymer stamps will react to the Stazon® cleanser and break down the stamps and will shorten their life span, and if you are like me, you love your stamps and want them around a very long time. So, to be safe, I avoid using Stazon® ink with my photopolymer stamps and then I don’t worry about that, I can clean them with the normal Stampin’ Mist®
Stazon Jet Black Ink
Using Aqua-painter
Using Alcohol Marker
Stazon Cleaner


I hope you have found this helpful in selecting which black ink to use for which coloring technique you are using. Please leave me a comment and let me know what you think and please, if you have any questions that you would like me to address here on the blog, just let me know in the comments below and thank you so very much for stopping by and spending some time with me.
Have a great day and Happy Stamping!
Katrina

01 09 10 Code line 7 9 is for loading jQuery library. Remove this line if you’ve already loaded it somewhere else in your blog. Hint: If your blog has an image slider, carousel or something with fading effect running, chances are it is powered by jQuery. If this widget doesn’t work, the first thing you want to do is comment out or remove this line. To use your own button, replace the URL in line 3 with the direct link URL to the image. Make sure to keep the quotes. To reposition the button, replace