Hello
I hope this finds you all warm and toasty. Here in Central NY we are getting a winter blast from our friend Lake Ontario. Right now, I am listening to the wind knock at my door, driving my poor little Tucker crazy! Anyway, I did manage to get a couple of cards made using the "First Sight" stamp set from the 2016 Occasions Catalog found on page 36. I just love this set. I find it to be so versatile and so pretty.
The first card I used Watermelon Wonder Ribbon and ink with Sahara Sand ink and cardstock. The second card uses Sahara Sand Cardstock and ink with Melon Mambo. Stay tuned for more ideas using this set and be sure to check out this weeks weekly deals and don't forget about my online party where you could be the hostess with the mostest...mostest Stampin' Rewards that is! So be sure to place a minimum $30 order to be placed in the drawing and you could be selecting a minimum of $15 in free product! Just use the hostess code AZHFKHGX when placing your order.
In the meantime, have a great day, stay warm and happy stamping!
Katrina
January 19, 2016
January 12, 2016
Foxy Rose
Well hello! Have you had the opportunity to pour over the
new Occasions catalog? If you haven’t, you have no idea what you’re missing! I
have to tell you, I am in L-O-V-E with this catalog! Could it have something to
do with Valentine’s? Maybe? But, I really think it’s just because everything is
a “must have” in my opinion! OMG! Check out this card I made using the Rose
Garden Thinlits and the “Foxy Oxi” technique (uses Oxiclean).
It’s so pretty and so elegant; I wish you could see the shimmer of the rose from the clear Wink of Stella. Do you want to know the BEST
part of all? The Rose Garden Thinlits are a part of a bundle! Yes, a bundle that will
save you 15%! Now, who doesn’t like to save money? “I don’t” said no crafter
EVER!
I will tell you, this set of Thinlits is very intricate and
I do suggest you use it with the Precision Base Plate and the Big Shot Die
Brush, also found in the Occasions catalog on page 19. They will ensure not
only a perfect cut but an easy removal of the design from the die without
having to sit and poke out each and every hole in the die with a “pokey” tool,
you know, the paper piercer.
Well I hope you enjoyed today’s card, please let me know in
the comments below and don’t forget about my on-line party going on right now
until January 30th. I will be drawing for a hostess to earn the
hostess rewards on that date, so why not have it be you? It will be a minimum
of $15 in hostess rewards, so place that minimum $30 order to get your name
entered into the drawing, and if you place a $50 order, you will earn a
Sale-a-bration item as well! (All
qualifying order totals are before shipping and tax)
See you Saturday and Happy Stamping!
Katrina
January 9, 2016
Pretty in Pink
Well hi there! The new catalog has been live for almost a week now and it has been a big hit! I have another sample for you, using some new stamps from the Occasions catalog and the Sale-a-bration catty too!
I love how the Mellon Mambo and Smoky Slate come together to make this card. The Designer Series paper comes from the Sale-a-bration catalog while the stamped flower and sentiment comes from the stamp set Blooming Birthday found in the new Occasions Catalog. The stamped border is from the Tin of Cards stamp set found in the Annual Catalog. For the layout, I found a sketch on Pinterest and followed that and there you have it, a bright and cheery card.
In honor of the new mini catalog, I am going to have an On-line party and I would like you to come. I invite you to place a minimum order of $30 before shipping and tax, using the hostess code: AZHFKHGX and you will be placed in to a drawing for the hostess rewards. Just go to my online store and place your order. I will close the party out on January 30th and will notify you by email that day to pick out your hostess reward items; so be sure to not check "No Contact" when placing your order, otherwise, Stampin' Up will hide your contact information from me and I will not be able to contact you. Now, if you place a $50 order, before shipping and tax, you will also be able to pick out a FREE item from the Sale-a-bration catalog as well! Now,if your order totals $150, DO NOT USE the hostess code! You will automatically qualify for hostess rewards!! And for every order placed, I will send you the complete supply list and instructions for this card as an extra little bonus from me. If you need a catalog, please feel free to contact me and I will get one out to you right away.
I hope you are all having a great start to your weekend! Be sure to enjoy and get some stamping in and I will see you all here again on Tuesday!
Happy Stamping!
Katrina
January 5, 2016
Spring Time Friends
Hello! Today starts the beginning of one of the most
exciting times of the year at Stampin’ Up!, Sale-a-Bration! Yes, I love
Sale-a-Bration! Where else can you get something free just for spending $50?
Especially, when you were going to spend the $50 any way? The Spring Occasions
catalog is to die for, so many beautiful stamp sets and accessories for
birthdays, Easter, Mothers Day and Fathers Day, and of course, just because. I
love new catalogs! It means, fresh, new ideas and brand new products to spark
creativity. Today’s card is just an example of what you will find in the new
catalog. This uses the brand new stamp set, Birthday Blooms. It’s so pretty and
so feminine. I just love it.
What do you
think?
To create this card, I cut a card base from So Saffron CS, 8
½” x 5 ½” and scored it at 4 ¼” and added a piece of So Saffron DSP from the Subtles
DSP pack, cut at 5 ¼”x 4” with Fast Fuse. I then cut a piece of Whisper White
CS 4 ¾” x 3 ½” and stamped the large floral image from the stamp set into the
bottom left corner using Momento Tuxedo Black ink. I framed the image using the
same ink and the loopy border stamp from the “Tin of Cards” stamp set found in
the Annual Catalog. I proceeded to color the flowers, using the blending pen
and So Saffron ink and outlined them in Hello Honey ink. I colored the leaves
using the Pear Pizzazz ink and outlined them in Old Olive ink, also with the
blender pens. I added a sentiment from
the same Birthday Blooms stamp set and added the panel to the card base, using
Stampin’ Dimensionals. A very easy card with a lot of punch, don’t you think?
And to add a little something extra special, I added a little clear Wink of
Stella to the flower petals and that put this card over the top as a WOW card!
You really need to see it in person that’s for sure. The shimmer is just
amazing.
If there was just one product I could buy from this new
catalog, it would be Wink of Stella! That just takes your simple projects and makes
it look like an amazing, wow project. If
you have never tried it, I would say this is a MUST have for your stamping
arsenal.
Ok, well I’m off to see what else I can do with the goodies
from this new catalog release. Be sure to browse through the catalog and see
what wonderful goodies you find that you must have and feel free to leave a
comment below to let me know your thoughts about today’s’ card and the new
catalog offerings.
Happy Stamping!
Katrina
December 29, 2015
New Occasions Catalog Sneak Peak!
Hello! I hope you all had a wonderful holiday, surrounded by
family and friends. I know that I did. I feel blessed beyond measure and very,
very spoiled! We had an unusually warm Christmas for CNY, Christmas Eve topped
out over 60o F! That has NEVER happened here in my lifetime! Today,
is an entirely different story! Snow, sleet, and freezing rain have made it’s
way here. Dreadful driving conditions, that’s for sure. Anyhoo, It was
beautiful for the holiday and I truly enjoyed the day this year, and I pray
that you did too.
Now, I’m back to work at my “real” job as a Clinical
Informatics nurse and back at my craft room desk creating. As you may know, the
new Occasions catalog goes live January 5th, and as a demonstrator,
I get to order a little earlier so that I can make a few things ahead to share
and so, here is a sneak peak of one of the most adorable stamp sets in the
catalog! I just love this set and there are some awesome sentiments that come
with it!
So, what do you think? Let me know in the comments below.
I got the inspiration from a bag design in the catalog. I hope to have a few more sneak peaks before the New Year. I can’t wait for you to be able to see the
catalog, once again, Stampin’ Up! has out done themselves….there are so many
wonderful stamp sets and dies and punches and accessories and the list goes on.
If you would like a catalog and you have not placed an order with me in the
past, feel free to send my your contact information and I will be sure to get
one out to you right away. This is definitely a MUST see.
Have a wonderful day and I will see you soon!
Happy Stamping,
Katrina
December 15, 2015
For a Friend
Well I had a special request from a friend at work. She
asked me to make her up some Thank you cards with a Christmas theme. Hmmm, a
challenge! So, I pulled out my Christmas stamps and my Thank you stamps and
began to ponder. She mentioned that she “loves poinsettias”, so, here is what I
came up with:
I began with a Garden Green card base cut 5 ½” x 8 ½” scored
at 4 ¼”. Then I punched out 8 large petals, with the Festive Flower punch, from
Real Red cardstock and 4 smaller petals and 2 of the double petals also from
Real Red cardstock. I then punched out 3
of the large petals from Garden Green cardstock for the leaves. I stamped the
Thank you from the One Big Meaning stamp set found in the annual catalog, onto
a piece of Whisper White CS cut 5 ¼” x 4” and adhered that to my card base. I
then stamped all of the flower petals with Real Red ink and the leaves with
Garden Green ink. To build the flowers, I punched 2 circles from Real Red
cardstock with a 1” circle punch. I applied Fast Fuse adhesive to the first
circle and began adding the larger petals. To get a nice fullness to the
flower, I first folded each of the petals to add dimension. I then began
placing them onto the circle. I started by placing them into a + formation then
placed the remaining 4 petals in-between in a pin-wheel like formation. I then
added Fast Fuse to the second 1” circle and added the 4 smaller petals, also in
a + formation and adhered that on top of the larger petals off-set using a
Stampin’ Dimensional. I then added the 2 double petals also with a dimensional
and placed the Garden Green leaves onto the back of the completed flower using
Fast Fuse. I then added 2 flower centers, off-set using Crushed Curry cardstock
that I punched using the Festive Flower punch. I then added the flower to the
front of the card using 3 Stampin’ Dimensionals. And finally, I added 3 tiny pearls to the center of the flower.
So, that’s the card for today. I hope you like it, please
share you thoughts with me at the bottom in the comments section, and I wish
you all a great day. See you Saturday!
December 10, 2015
Purple Majesty
Well Christmas is barreling ahead, are you ready? I’m not
ready yet, but I am working on it. Yesterday was my husbands’ birthday. I
grabbed a cake on my way home from work last night so we could at least recognize
his day with a birthday cake and I made him a nice dinner. I think he liked
everything. Next up, our 22nd Anniversary, followed by MY birthday,
Christmas and then my sister-in-law and my great nephew’s birthdays. Phew, I’m
exhausted just writing all this!
Anyhoo, I managed to sneak into my craft room for a bit and
played awhile, and this is what I came up with:
I used a retired stamp set for the sentiment because I just
love the scripting of the font. I think it’s so pretty. I also love the dark
Blackberry Bliss ink with the Basic Black ink. I just seems so majestic to me,
hence why I’m calling it Purple Majesty. Yeah. I know…not too creative but it
fits.
This is a really easy card to re-create, I used the Lovely
as a Tree set, Blackberry Bliss cardstock of the card base, a layer of Basic
Black and stamped the image onto Whisper White cardstock using the new Basic
Black Archival ink. I then sponged Blackberry Bliss ink starting at the bottom,
working my way up, over the stamped image. That helped me get a heavier color
on the bottom and gradually lighten as I worked my way up.
So that’s my card for today. I hope you like it. Thank you
for stopping by, I really appreciate it. Please feel free to leave me any
comments in the comments section below.
Happy Stamping!
Katrina
December 2, 2015
Christmas is in the Air!
Hi all. I hope everyone is recovered from their turkey coma.
I finally have and now I have my house filled with the Christmas spirit. I
finally got my tree up Sunday and all of the inside decorations too. All that’s
left is the outside and I will be done with that. I still have to finish my
Christmas shopping but I did get a good start on that too awhile back I really
hoping I am going to have my first “stress free” Christmas?? I hope anyway. I
am usually running around like a chicken Christmas week trying to finish up the
Christmas shopping, and this year I made myself get an early start. I had my
great niece and nephews all done before Halloween! And now I just pick away at
someone every week or two. I will let you know after Christmas how that works out
for me.
Anyway, I have a cute Christmas card to share with you that
I put together. I am really happy with how this card came together. I started
with a left over card “kit” that I had cut for a class last year! I challenged
myself to pull out left over kits and make something out of them. I have
several different kits from several different classes that are just sitting
there waiting for something to be done with them, hence my challenge to myself
and this is what I came up with.
I started with a piece of Early Espresso cut at 6”x6” scored
at 3” for the card base, I then stamped Happy Christmas from the Oh What Fun stamp set in the lower right hand
corner of a Very Vanilla piece cut to 2 ¾”x 5 ¾” using Real Red ink. I cut 2 of
the small round ornaments from the Delicate Ornament Thinlits dies in the
Holiday Mini catalog and I used the new Precision Plate, one from gold foil
paper and one from Real Red foil paper and adhered them to the left side of the
card using the new Fine Tip Glue pen
also from the Holiday Mini catalog. I tucked a piece of gold cording behind the
Very Vanilla and strung it to the red ornament and added a bow from the cording
to it using a glue dot. I adhered a second piece of Very Vanilla card stock cut
to 3”x5 ¾” inside the card base and then I made a matching envelope from the
Neutrals Envelope paper from the Annual catalog using the envelope punch board.
My paper was cut 7 5/8” square and I made the first score and punch at 2 ¾”.
Thanks so much for stopping by, I truly appreciate you
taking the time to spend with me here. Please let me know what you think of the
card by leaving a comment down below.
Have a great day and Happy Stamping!
November 28, 2015
Quick and Easy Gift Card Holders
I hope you all had a wonderful Thanksgiving. I got to do it twice. Thursday I spent the day with my mom and dad and dinner with them since hubby had work. We had a great day together, then Friday, while the masses were out shopping til they dropped, I cooked a complete turkey dinner for my husband so he could enjoy a Thanksgiving dinner.
Wow, is it me or is Christmas coming at full speed ahead or what? Did you realize Christmas will be here in 28 days? Yep, that’s right, 28 days until Santa and his eight Reindeer arrive bearing all those gifts. Will you be ready? I’m working on it.
Today, I have a quick and easy gift card holder for you.
Yes, really, you can whip up a dozen of these in no time.
Start with a medium Whisper White envelope and score it down
the middle.
Cut the flap through the middle and tuck the right half into
the envelope and then adhere the left side down. It should look like this:
It is in the right side you will slip your gift card.
You will then need a 2 ¾”x5 ¼” piece of Designer Series
Paper. I used paper from the Merry Moments Designer Paper Pack, but you can use
whatever paper you like. Now adhere that to the front of the envelope turned
gift card holder.
Using a scrap of Whisper White cardstock I stamped the
Christmas Image from the Among the Branches stamp set using Cherry Cobbler Ink
and punched the image out with the 2” circle punch and punched out a scrap
piece of Crumb Cake using the 2 3/8” scalloped circle punch and adhered
the two together. I then wrapped a 16”
piece of Cherry Cobbler ribbon (retired) around the card holder and tied it into a ribbon off to the side and
placed the punched image over the ribbon using 2 Dimentionals straddling over
the ribbon.
There you have it, a quick and easy gift card holder. Change
up the images and the paper and ribbon for a completely different look. How
about for a birthday? Lots of ideas and options. Go ahead and give it a try.
Thank you for stopping by. Please leave a comment and let me
know you were here and what your thoughts are. Happy Stamping!
November 21, 2015
Feed a Cold, Starve a Fever?
I never could get that wives tale right? Who knows it?
Please share! Anyway, I decided to “feed a cold” and made these cute Get Well
cards. I love this stamp. It’s in the Annual catalog and is a singular wood
block stamp and it makes me think of chicken soup every time I look at it so
this is what I came up with and wanted to share it with you.
So, I started with a sheet of Island Indigo cut to 5 ½”x8 ½”
scored at 4 ¼”, I added a piece of the Island Indigo designer paper from the
Regals paper pack (the paper I used is retired, however there is a new pack
available with fresh designs) cut at 5 ¼”x4” and I round the 2 opposing
corners, top right and bottom left of the card base and the layers.
I stamped the image onto a piece of Whisper White cardstock
cut at 4 ¾”x3 ½” using Momento Tuxedo Black ink pad and I masked off the heart
in the center of the bowl with a 1” circle I punched from a post-it note to
avoid getting black ink on it. I then colored the heart in using the Island
Indigo Stampin’ Write marker, I huffed on the stamp, and stamped the image onto
the white cardstock. I then colored the “soup” with the Hello Honey Stampin’
Write marker and the rest of the image was colored using the Rose Red Stampin’
Write Marker. I adhered that down to the designer paper layer after rounding
the apposing corners to match the others and then attached them to the front of
the card base. I then added 3 Rose Red Candy Dots to the bottom right corner.
I cut a second piece of Whisper White cardstock 5 ¼”x4” and
added to the inside of the card and stamped the get well sentiment from the
Fabulous Four stamp set, also in Momento Tuxedo Black ink.
I created the pocket for the inside front cover using a
piece of Island Indigo cardstock cut at 3 ¾”x5” and scored 3 sides at ½” and ¾”
using the Stampin’ Score board. I folded all of the score lines and cut away
the “corners” created by the score lines, added adhesive (I used Fast Fuse, my
favorite adhesive) and attached the pocket to the inside front cover. I popped
a packet of instant Chicken Noodle Cup-o-Soup into the pocket and there you
have it, a heart warming, cold feeding get well wish for someone special.
Thanks so much for stopping by, I hope you like today’s
card. Please leave me a comment and let me know what you think. Happy stamping!
November 17, 2015
Scraps! Scraps! Everywhere Scraps!
Are you over-run by scrap cardstock?
Do you hate to reach for your scraps when you need just a small piece? Do you
find it just easier to cut another full size sheet rather than look through
that pile just to find the right size and color? If your answer is “yes”, and I’m
sure for many of you it is, then you have come to the right place!
I have been there! Up until very
recently that is. Now, I don’t claim to be a professional organizer, nor do I
profess to be a great organizer, but I do keep trying new ideas until I find
one that works for me, and finally I have found what works for me and I am now
consistently reaching for my scraps to find what I need BEFORE I cut another
full size piece of cardstock!
I can’t tell you how many things
I had tried that just didn’t work for me because it would be too numerous to
count; just know that they did not work for me. You see, for my workflow, I
need my supplies conveniently located and easily accessible and organized. If I
need to paw around too much, that doesn’t work and only causes me stress and aggravation…no
good for a crafter! Our crafting is supposed to bring relaxation and joy right?
So I would just cut more cardstock and make MORE scraps to store. I couldn’t
bear to throw away a perfectly good piece of cardstock but I would never use it
because it was too hard to find or too time consuming to find it. Hence, my
continued search for what would work for me.
As I mentioned, I did finally
find a simple system that worked for me and I wanted to share it with you. Now,
I understand this may not work for your space and workflow, however, I find it
works really well for me so here it is:
The best part…it is so simple it’s
crazy! I just labeled the manila folders with the color names and I grouped “like”
colors together, like Basic Black and Basic Gray with Smoky Slate in one. I did
make a separate folder for Whisper White because I always have lots of white
scraps. I placed all the folders standing up in a plastic “tote” and I can not
tell you how well this has been working for me. I have been using this “system”
for just over a month now and I am finally using up my scraps! It might look a little messy here because I was actually working when I took these shots, but now, when I need
a ½ sheet or smaller, of whatever color I need, I pull the folder containing
the color I need and quickly leaf through the scraps to see if there is a piece
that I can use, and most of the time there is. I’m no longer wasting my
cardstock and feel that I am getting much more value from it. So, if you too
are struggling to find a convenient storage solution, give it a try. It’s
inexpensive…I had everything laying around the office/craft room and I just
repurposed them.
If you give this a try, please
leave me a comment and let me know how it’s working for you. In the meantime,
Happy Stamping!
November 14, 2015
Those Dirty Little Photopolymer Stamps!
Have you gone to your craft room to make some cards or other
paper craft, pulled out your favorite photopolymer stamp set, only to be
disappointed and dismayed to find that it will no longer stick to your clear
block? I know I have…it’s a sure sign of all the lovin’ you’ve been giving that
set! And I have a tip for you to fix that issue!
First, get a bowl of warm soapy water. I like to use Dawn
Dishwashing liquid, I’m sure any will do, I just happen to prefer the blue
stuff for my pots and pans so that is what is in my kitchen. Anyway, drop those
dirty little stamps right into that bowl. Now let them sit for a minute or two.
I like to swish them around a bit too. Then I take a soft cloth and wipe off
the backs of the stamps with it and place them face down onto a towel and allow
them to dry. I wouldn’t suggest drying them with the towel as you don’t want to
transfer any lint onto them.
At this point, I also clean my clear blocks and to be honest,
my favorite way to clean them is with hand sanitizer and a terry cloth. The
hand sanitizer does an amazing job of cleaning the blocks. It removes any
sticky adhesive residue and cleans any dirt and oils and ink from them too. I
use the terry as a soft scrubber and that works well for me.
Now that you have cleaned and dried your stamps and your
blocks, you should have perfectly “sticky” photopolymer stamps again. I hope
you found this helpful. If you have any questions, please feel free to ask
below in the comments section.
Have a great day and Happy Stamping!
November 10, 2015
Peaceful Pines
There is
some truth in that stamp name. You can often find peace and solace walking
through the woods, observing Gods amazing creations, and around here, there are
lots of pines. I don’t know about you, but I love walking through the woods, of
course, my husband and I pretty much live smack dab in the middle of the woods
here in Upstate NY, so I guess I should love it.
Anyway, I
created this card using the Peaceful Pines stamp set and coordinating
framelits. It’s pretty simple and I really like how it came out.
All supplies used can be found below.
Instructions: I started with a Whisper White card base cut at 5 ½”x8 ½” scored at 4 ¼” I stamped the detailed pine tree onto a scrap piece of Whisper White with the Mossy Meadow ink and cut it using the coordinating framelit. I also cut a scrap piece of Smokey Slate using the same framelit. I then cut a scrap piece of Real Red cardstock using the Circle framelits (the 4th one counting from the outside in) and I cut a piece of DSP from the Merry Moments paper stack (found in the holiday catalog) to 2”x5 ¼”
Once I had
all of my pieces cut and stamped, I adhered the DSP using snail adhesive ( I
ran out of my favorite Fast Fuse – I can’t wait for my order to arrive!) I then
layered the Real Red circle a little to the right of center again using Snail
adhesive. I then cut a Tea Lace Doily in half, then folded that in half and
tucked it in behind the Real Red circle. I placed the Smokey Slate tree onto
the Real Red circle, also with Snail and the stamped tree I placed a little
lower than the other and popped that up on Dimentionals. I stamped the verse,
also from the Peaceful Pines stamp set in the lower right hand corner of the
card with the Mossy Meadow Ink.
Thanks so
much for stopping by and taking a look. Please leave a comment below and let me
know what you think.
Have a great
day and Happy Stamping!
November 7, 2015
A Cozy Christmas
Well, I hope wherever you are, you have been experiencing
the beautiful fall weather that we have been enjoying here in the Northeast.
Unusually warm temperatures and lots of sun…not normal this time of year in
these parts but I sure will take it and be grateful; it won’t be long and old
man winter will be here putting us into the deep freeze. Brrrr, I shutter at
the thought, however, A Cozy Christmas does warm me up. I love this stamp set
and couldn’t wait to use it.
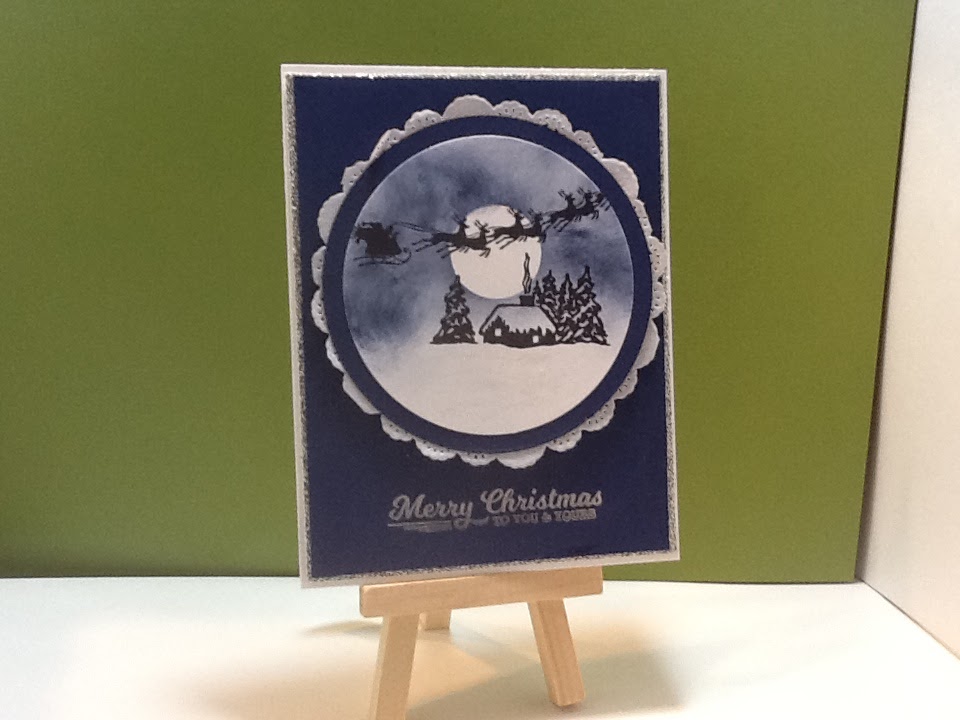
Here is my take on this beautiful stamp set and how I did
it:
I cut an 8 ½”x11” Whisper White
CS at 5 ½”x8 ½” and scored at 4 ¼”
I cut the 12”x12” Glitter paper
to 5 ¼”x4”
Night of Navy panel is 5”x3 ¾”
Using the Circle Framelits, counting
from the outside in, I cut the Night of Navy with the 3rd framelit
and the Whisper White with the 4th framelit.
I stamped the cabin from the A
Cozy Christmas stamp set onto the Whisper White circle using Basic Black
Archival Ink. I punched a 1” circle from a sticky note to create a mask for the
moon and placed it over the smoke stack created by the cabin stamp; I then
sponged Night of Navy ink to the “sky” area around the cabin. I stamped the
flying Santa Sleigh from the stamp set using the Basic Black Archival Ink,
added glue from the glue pen to the snow covered roof, the ground and the snow
covered trees and sprinkled with the dazzling diamonds.
I adhered the Night of Navy panel
to the Glitter paper using Tombow Mono-adhesive (green glue) and adhered them
onto the Whisper White card base using the same glue,
Once the Dazzling Diamonds
glitter was dry, I adhered the stamped image to the Night of Navy circle with
Snail adhesive, and then adhered them to a paper doily with the same. I then
popped them up with Stampin’ Dimentionals and adhered them to the card front.
The sentiment that I used comes
from the stamp set, To You and Yours Too, also from the holiday catalog. The ink
that I used is retired, it is the Silver Metallic Ink from last year’s holiday
catalog, however, it is easily found at your local craft stores. That’s it,
very simple and yet elegant with all the sparkle. So, what do you think? Leave
me a comment below and let me know what your thoughts.
Thanks again for stopping by my
little corner of the web and I wish you all a wonderful day.
Happy Stamping!
November 3, 2015
Stamping on Tile
I shared a
photo of some of the tiles I had stamped on Facebook, but wanted to share them
with you here with a mini tutorial on how I made them. These make great little
Christmas gifts and are rather inexpensive to make.
I started by
visiting my local Lowes Home Improvement store to purchase the tile. What I
found and worked well for me was a box of 9 Tumbled Granite tiles. Some of the tiles
were as smooth as can be and were easily stamped directly onto the tile, while others
were lumpy and bumpy with little moon craters throughout. Those lumpy bumpy
ones, I couldn’t stamp directly onto them so to get around that, I stamped my
pattern onto cardstock that I cut using the square framelits and my Big Shot.
I then colored the images and adhered them to the tiles using ModPog after
cleaning the tiles with a soft cloth to remove any loose dust. The ModPog
worked beautifully. It not only adhered the cardstock to the tile, but it also
provided a protective coating so that the tiles can be used as coasters and holds up to any moisture that may
occur due to condensation from cold drinks. In order to use ModPog, you will
need to stamp your image using Momento Tuxedo black ink and color your images
with an alcohol based marker such as Copic or Spectrum Noir. I will be honest,
I used the discontinued Stampin’ Up! Blendabilities, but any alcohol marker will work; then I added a heavy coat of
the ModPog. If you try to use a water-based marker or ink, it will run when you
apply the ModPog…..don’t ask how I know this!
Now, for the
smooth tiles, I just wiped them free of loose dust and used Stazon Jet Black
ink to stamp the image directly onto the tile. I allowed the ink to dry for a
bit and set it with my heat gun. I then colored in some of the images with my
Stampin’ Write markers. These are a water-based ink marker, however, I sealed
these with an acrylic spray sealer and there was no running of the color so it
worked out fine.
I hope you
enjoyed this and give it a try for yourself. Please leave me any comments below and let me know what you think. In the meantime, happy stamping!
Subscribe to:
Posts (Atom)