Showing posts with label stampin blends. Show all posts

August 19, 2022

More Perched in a Tree Ideas for You

 Well, I'm back! Oh what a day! Of course it started out like any other day, however, on my way to work, I was detoured off my normal route due to road construction into Amish Country and at the same time a cow managed to get loose from his pen/pasture and lo and behold, I hit a cow! I'm still in shock! I have had encounters with deer before, but never in my wildest dreams did I ever think I would hit a COW!!! Anyhoo, to make a long story short, I'm ok, my Jeep, not so much, She got a flat bed ride to the collision repair shop and I have a rental. It's nice (Honda CRV) but it's just not my baby!

Perched in a Tree Pool Party

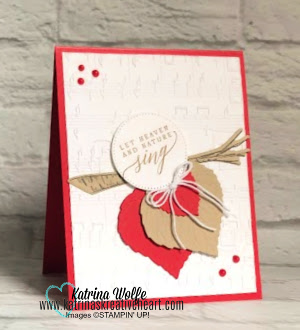
So, here is the latest card I made featuring the Perched in a Tree bundle. I love how this card came out. 

You can grab the downloadable PDF Here


Perched in a tree real red

I love Real Red and Crumb Cake together for Christmas cards. I find the color combo to have a warm country feel to them. Ant the new Pearlized Enamel Effects are UH-MAZING! They come in a package of 3, Black, Real Red and White and they make the PERFECT pearls and they adhere to your project nice and secure. 

Grab the downloadable PDF HERE


That's it for tonight friends. Watch out for Cows tunning in the road, stay safe and have a fabulous weekend! 
Happy Stamping,


Product List
Product List

July 12, 2019

Another Cute Card featuring We'll Walrus Be Friends

Hello and Happy Friday! Thank you so much for stopping by to hang out with me for a bit. Today's card again is featuring one of my all time favorite stamp sets, We'll Walrus Be Friends! I just love this cute little guy. I love him so much, I actually named him! Yes, I realize Wally is pretty predictable, what can I say? But isn't he the cutest? I mean really? !
For this cutie pie, you will find a list of supplies down below, linked to my online store for your convenience as well as a downloadable, printable PDF. I hope you will chose to shop with me for any supplies you may need to recreate this cute little dude.

Measurements:

Basic Gray 8 1/2" x 5 1/2" scored and folded at 4 1/4" and 4" x 3"
Pool Party 3 3/4" x 5"
Whisper White 3 3/4" x 2 3/4"

Directions:

Run the Pool Party cardstock panel through your die cutting/embossing machine with the High Seas 3D Embossing Folder and adhere to the front of the card. Then stamp the image and the sentiment onto the Whisper White panel in Memento Tuxedo Black ink, and color the Walrus with the light and dark Gray Granite Stampin' Blends and the ice burg and water with the light and dark Pool Party Stampin' Blends. Adhere the panel to the 4" x 3" Basic Gray panel and attach to the card front using Stampin' Dimensionals

Quick and easy peasy card that will make any recipient smile! Grab the PDF below


Happy Stamping!


Product List

June 25, 2019

Free As A Bird Fun Fold

Hello and Happy Tuesday to ya! Hubby is on vaca this week so it's been a busy few day's with him home. Next week we will both be on vaca from our day jobs and that will be a first in a VERY long time and boy will Tucker be one happy little puppy! He's a totally different little dog when both of his peeps are home with him. He has terrible separation anxiety the poor little bugger. He loves company, but he looses his mind when they're about to leave. We often wonder if he decides they are "his personal toys" because, trust me, he doesn't like you to touch "HIS" stuff! No, he's not "mean" in the sense that he bites, but he will "snatch" his toy's from you hand like "no, that's mine and don't TOUCH IT!" Good thing he's so stinkin' cute!
Anyway, today's card is from Sunday's Facebook Live featuring the Free As A Bird stamp set and I promised, dimensions and instructions would follow here. So, here they are so that you can recreate this card and the supply list can be found below. This card uses a fun fold fold. I'm not even sure what this fold is called, so if any of you out there know what fold this is, please let me know...inquiring minds want to know! 
To begin, you will need a card base of Daffodil Delight cut 4 1/4" x 11" scored at 2 1/4" and 7". Fold and burnish your score lines and using the Layering Circles dies. Add a piece of Bird Ballad DSP measuring 2" x 4" to the top flap. Then,  I used the die that came closest to 2 1/2" and die cut it by centering it over the 2 1/4" fold line off to the right of the card. I then die cut another piece of scrap Daffodil Delight using the same die. I layered a piece of Bird Ballad DSP cut 4" x 3 3/4"on the outside panel created by the 7" fold and a piece of Whisper White cut the same size to the inside of the flap.
Die cut another circle in Petal Pink and stamp the single bird in Memento Tuxedo Black ink and color the bird in with your Stampin' Blends, I used Soft Suede and Petal Pink with a little Daffodil Delight for his beak. Then die cut with the next smaller Layering Circle die. Stamp "Hello" from the stamp set using the Memento Tuxedo Black ink and layer all the circles together. Close up the card, add adhesive to the exposed area and adhere the die cut image. You now have a fun fold card.
I love coloring with my Blends, they are so easy to use and whether you're into blending or not, these markers make you look like you know what you're doing. So, don't shy away from them. The price point for them is amazing. If you check the Big Box stores for alcohol markers, they are as much as $7-$9 a marker on sale. Blends are $9 for the duo! Hellooooo? You can't beat that!
Well, I hope you enjoyed today's card. Thanks so much for stopping by to check it out and hang out with me. Be sure to stop by Thursday, I will have all the information on the Flip Fold card from Sunday then. If you enjoyed today's tutorial and would like access to even more delivered directly to your inbox, be sure to sign up for my newsletter here
Again, thanks so much for stopping by, have a great day and Happy Stamping,


Product List
01 09 10 Code line 7 9 is for loading jQuery library. Remove this line if you’ve already loaded it somewhere else in your blog. Hint: If your blog has an image slider, carousel or something with fading effect running, chances are it is powered by jQuery. If this widget doesn’t work, the first thing you want to do is comment out or remove this line. To use your own button, replace the URL in line 3 with the direct link URL to the image. Make sure to keep the quotes. To reposition the button, replace